MIAD Interior Architecture and Design - Creating Spaces

|
Title : IA&D Project
Medium : Mixed media - Cardboard, chipboard, glue, paper, ink Date : July 2022 Exhibition Text :
Inspired by the interior design of Luke Edward Hall, I created this piece with the intention of designing a maximalist, live-able home for the client profile I was provided. Hall uses bright color palettes and lots of furniture, art, and decorations to create spaces that are personal and expressive to reflect those who live in it. I wanted to replicate this, creating something with character that the client can comfortably live in.
|
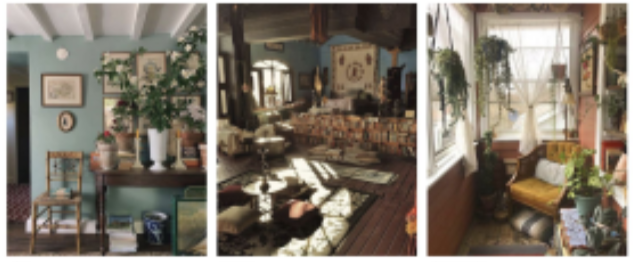
Inspiration :

My main inspiration for this piece is the interior style of maximalism, and I referenced artist Luke Edward Hall throughout my process. Hall is an artist and designer, with works that often reference historical and romanticism styles. Going into this project, I knew I wanted to use maximalism as a reference, but didn't really know where to start in terms of finding others who have done the same. I had a very specific idea in mind, but wanted to find a specific example of what I was thinking of, and Hall's work is just that. Many maximalism interiors feel very overwhelming, with loud patterns and bright colors. While I don't mind this to an extent, I wanted something darker and more moody, but keeping the idea of having things everywhere and there always being something to look at. One example from Hall's work is his project titled "Cotswolds Cottage," which is the design of a cottage Hall rents with his partner. Though the space I was assigned to design is an apartment, it has a lot of very old architecture, and I want to capture an almost "cottage" feel, with the client being a secluded author. Because of this, Hall's cottage design appealed to me very much, and I took a lot of inspiration from them as I was working on the interior design elements.

One of the many things that stood out to me about Hall's design was his use of color. While the spaces have lots of color, it isn't overwhelming or uncomfortable to look at. He sticks to color palettes that are very cohesive, while still showing off lots of furniture, sculpture, books, art, etc. Though I plan on using more muted, earthy colors, I want to emulate this intentional use of color to create a welcoming, comforting space. Another aspect of his work that I really like is the fact that his designs feel like a home that can be lived in, as opposed to something that needs to be clean and well kept for the design to translate. No matter where you look, the space is always filled with something, whether it's art on a wall or comfortable looking chairs to spend time in. All of these things look like they have stories behind them and where they came from, and it gets rid of the "model home" feeling that I find many minimalist or more modern designs have. This is another thing that I would like to include in my own work. Since we have some creative freedom on our client, I want to make them someone who appreciates art and enjoys collecting things. This way, I have a way to include the clutter-like elements that make Hall's designs so unique.
Planning :

In this project, we were assigned an apartment unit that we would then design an interior for with a client in mind. There were two main aspects to it, the interior architecture of the building and the floorplan/layout. This very first step consisted of us creating bubble diagrams, which are diagrams that give an extremely general idea of where each room would go. This would allow us to later build on top of an already existing idea, as opposed to attempting to build walls from virtually nothing.
In order to create the bubble diagrams, I first made templates of the unit that we were designing. To do this, we were given lightboxes and I traced a copy of the template onto a blank piece of sketch paper. At first I started by using a pencil and a ruler, then tracing the pencil with a sharpie, and then going in with a sharpie without a sketch or ruler. I made probably 20-30 of these copies, slowly practicing and improving my sketching skills until they got to a point where they were presentable. As I was making these blank diagrams, I added the bubble diagrams on top, again, first with pencil, then just sharpie. I was given a list of rooms that had to be included, which were an entry, a kitchen, a dining room, a bedroom, a bathroom, a living room, and a library/study space. There was also a client profile that I had to keep in mind throughout the project, but in this section, the most important parts were the fact that they lived alone and stayed home working/writing most of the time. With these in mind, I was able to tailor the design to fit the clients needs and be the most convenient space possible.
When drawing the "bubbles" on top of the diagrams, I would try and to make as many variations of the space possible, and took notes on many of them as to how and why they might be effective.
Process :

STUDY MODELS
After having created the bubble diagrams, the next step was to create study models of some of the diagrams that I liked the most. To do this, I was provided with a template of the empty apartment, which I taped onto chipboard and used a ruler and craft knife to cut out, including the windows and doors. I cut out the whole thing as one silhouette, and then cut along the edges that would fold up and attach to other walls to create a 3D model of the room. I folded up the walls and glued the pieces that needed to come together, using a square to make sure all the angles were 90*, and continued this process until the whole thing was assembled.
After having created the bubble diagrams, the next step was to create study models of some of the diagrams that I liked the most. To do this, I was provided with a template of the empty apartment, which I taped onto chipboard and used a ruler and craft knife to cut out, including the windows and doors. I cut out the whole thing as one silhouette, and then cut along the edges that would fold up and attach to other walls to create a 3D model of the room. I folded up the walls and glued the pieces that needed to come together, using a square to make sure all the angles were 90*, and continued this process until the whole thing was assembled.

|
From here, I cut out another piece of chipboard, this time only of the floor, this way I could create inserts to take in and out with different floor plan options. At this point, I took the bubble diagrams I was planning on recreating and made a couple quick sketches of where the walls would be. I then measured out a strip of card stock that was the same height of the walls, and used this to cut out the interior walls so they would be consistent with the outside. Once I had a sketch I liked, I used it as a reference to sketch onto the floor panel, and then cut out pieces of cardboard the same length. I then used the same method as I had before with the square and glued the walls in place. This process took a little while, but I made sure to add doors and openings when needed, and continued to reference the original bubble diagram and sketch. I also used small wooden dowels to create the effect of various things, such as built in furniture or pillars in the space. I repeated this process 3 or 4 more times, making more models and sketches until i finally landed on one I liked, which I decided to explore and use as a starting point for my final project.
|
DESIGN PRECEDENTS
The design precedents was the first step in the actual interior section of the project. I made a google drive folder, each labeled with one of the rooms. From here, I found three images that would reflect what I wanted for the design of each room. I found most pictures from Pinterest, and had a lot more then I needed. I eventually narrowed them down to three per room, and tried to make sure they were similar in design, but had different types of furniture and decor. I then assembled them into a slideshow, again with one room per slide. For each individual image, I made a couple notes about what elements I liked from it, such as a specific chair or the placement of wall art. Once this was done, I was finished with the precedents and could move on to the color palette and mood board.
The design precedents was the first step in the actual interior section of the project. I made a google drive folder, each labeled with one of the rooms. From here, I found three images that would reflect what I wanted for the design of each room. I found most pictures from Pinterest, and had a lot more then I needed. I eventually narrowed them down to three per room, and tried to make sure they were similar in design, but had different types of furniture and decor. I then assembled them into a slideshow, again with one room per slide. For each individual image, I made a couple notes about what elements I liked from it, such as a specific chair or the placement of wall art. Once this was done, I was finished with the precedents and could move on to the color palette and mood board.

MOOD BOARD + COLOR PALETTE
After having the design precedents, I worked on the mood board and color palettes. The mood board was a collection of images that conveyed the feeling of the design, but they couldn't be pictures of interiors or anything that would be in the apartment. Instead, I had to collect pictures of textures, landscape photos, and anything else that would show the idea that I was trying to get across. After picking out these images, I wrote five or six words that also described the images and the design. Once the mood board was done, I created the color palette. To do this, I put the mood board into a color palette generator to find the colors that were most prominent. I picked the ones I liked best and felt were the most cohesive with each other and the design precedents, and then edited them until I was happy with the outcome.
After having the design precedents, I worked on the mood board and color palettes. The mood board was a collection of images that conveyed the feeling of the design, but they couldn't be pictures of interiors or anything that would be in the apartment. Instead, I had to collect pictures of textures, landscape photos, and anything else that would show the idea that I was trying to get across. After picking out these images, I wrote five or six words that also described the images and the design. Once the mood board was done, I created the color palette. To do this, I put the mood board into a color palette generator to find the colors that were most prominent. I picked the ones I liked best and felt were the most cohesive with each other and the design precedents, and then edited them until I was happy with the outcome.

FURNISHED FLOOR PLAN
One of the final steps in the interior process was creating the actual furnished floor plan. Having the design precedents done at this point was incredibly helpful, as I had an idea of the furniture I wanted and how it would be layed out. Since I didn't have to keep the colors or designs of each piece of furniture in mind, I just payed attention to the which pieces I needed to include in each room. I messed around with a lot of different options, and eventually landed on my final draft. I wanted the furniture to be along the same tilted layout as the walls, so I kept this in mind while working on the design. After my draft was finished, I created the final copy by tracing it over a light table, using a ruler to make sure all the lines were straight. Given as this was a more maximalist design, the furniture was very close together and I made sure to add lots of rugs, lamps, and other various pieces.
One of the final steps in the interior process was creating the actual furnished floor plan. Having the design precedents done at this point was incredibly helpful, as I had an idea of the furniture I wanted and how it would be layed out. Since I didn't have to keep the colors or designs of each piece of furniture in mind, I just payed attention to the which pieces I needed to include in each room. I messed around with a lot of different options, and eventually landed on my final draft. I wanted the furniture to be along the same tilted layout as the walls, so I kept this in mind while working on the design. After my draft was finished, I created the final copy by tracing it over a light table, using a ruler to make sure all the lines were straight. Given as this was a more maximalist design, the furniture was very close together and I made sure to add lots of rugs, lamps, and other various pieces.
COLLAGE, DRAWING, + FINAL TOUCHES
After finishing everything for the design of the apartment and the interior, I was able to create a collage and drawing of the study. For this part, we only did one room, and did the study since it was the main focus of the apartment. I picked out specific pieces of furniture that matched up with the floor plan, as well as the design precedents and color palette. I put them together into a collage, giving a general idea of what the room would look like had it existed. I also created a drawing of the study, using the model and collage as a reference. I created it digitally, sketching out the layout, furniture, and decorations. I colored it in, adding shading that was cohesive with the windows and lights in the layout. After this, my entire project was put into a slideshow, and it was finished.
After finishing everything for the design of the apartment and the interior, I was able to create a collage and drawing of the study. For this part, we only did one room, and did the study since it was the main focus of the apartment. I picked out specific pieces of furniture that matched up with the floor plan, as well as the design precedents and color palette. I put them together into a collage, giving a general idea of what the room would look like had it existed. I also created a drawing of the study, using the model and collage as a reference. I created it digitally, sketching out the layout, furniture, and decorations. I colored it in, adding shading that was cohesive with the windows and lights in the layout. After this, my entire project was put into a slideshow, and it was finished.
Experimentation :
This piece was something completely new to me and required a lot of experimentation for the skills I've never had to use before. One of these skills was something very simple but that I struggled with quite a bit - drawing straight lines free handed in order to draw floor plans without needing a ruler. To begin experimenting, the professor had my class draw a series of straight lines, not in any particular order. We would draw them very fast, and then very slow and stable. Doing this helped me to become more confident in my line work, which allowed me to draw the lines straighter as I continued to practice. I also created a lot of empty shells of the floor plan, tracing it using a light table. I did the first ones using a pencil and a ruler, going over top with sharpie. I slowly moved to using only the ruler and sharpie, and eventually to free-handing with the sharpie. This again helped me improve my line confidence, and allowed me to work much faster and more efficiently in the long run.
Critique :
Similarities May Include :
- Both my work and Hall's have interiors in a more minimalist style, as opposed to modern or minimalism. I took a lot of inspiration from Hall, and the way he used maximalism to create a visually appealing space, but one that still felt like a home. We both used lots of art, furniture, and just things in general to make the space more personal to the person living in the space.
Differences May Include :
- For my project, I was designing an apartment, whereas Hall was designing a cottage home. Because of this, there is much more room in Hall's space for different elements.
Reflection :
This project was something completely new to me, as I have never done anything with architecture or interior design before. I was able to develop a lot of skills that I have never worked on before, such as creating floor plans that are visually appealing as well as effective for the client I was designing for. I was inspired by the interior design movement and style of maximalism, and this was something I kept in mind the entire process in order to make the entire design cohesive. I encountered a lot of challenges throughout the process, but I found that the main one was creating the unfurnished floor plans. I went through countless designs that just never landed, and I felt very stuck from the constraints of the apartment I was designing for, as it was pretty much just a square with an inconvenient hallway and a little out shoot in one of the corners. I was finally able to break through this though, when I had created a design with one of the walls coming out from the 45* angled wall, and my professor told me to take that and run with it. I was able to work off of it to eventually create my final design, and I ended with something I was super happy with. On the contrary, my favorite part of the process was the interior design process and creating the design precedents. I've always been kind of interested in interior design, so this was pretty fun and it was interesting to finally get feedback on the work that I had. I was able to pick out a design that I really enjoyed, as well as something that fit the client profile.
ACT Questions :
Clearly explain how you are able to identify the cause effect relationship between your inspiration and its effect on your artwork?
My inspiration was Luke Edward Hall, who designs maximalist homes that provide a sense of comfort, and I wanted to replicate this using a similar style to design a space for the client I was assigned.
What is the overall approach the author has regarding the topic of your inspiration?
Modern interior design often feels emotionless and lacks substance, but a maximalist approach allows for a visually appealing design that allows the occupant to show their personality and have a space that is actually pleasant to live in.
What kind of generalizations and conclusions have you discovered about people, ideas, culture, etc. while you researched your inspiration?
I found that someone's personality and self expression shows through much more clearly in a maximalist design, as they can cover the space in art, images, and belongings that represent them as a person.
What is the central idea or theme around your inspirational research?.
Self expression is very important in a living space, as it is where you spend much of your time, and it is important that it is a reflection of who you are.
What kind of inferences did you make while reading your research?
Maximalist decor, with lots of furniture, decorations, art, and anything else, can create a cohesive and expressive design when there is a consistent color palette and design precedents.
Citations (in MLA Format)
https://www.lukeedwardhall.com/info
